Ngrok คืออะไร
Ngrok เป็น Tool Open Source พัฒนาโดย GitHub ซึ่งอำนวยความสะดวกให้บุคคลอื่นสามารถเข้าใช้งาน Website หรือ Application ที่กำลังทำงานอยู่บนเครื่อง Localhost นั่นเอง อีกทั้ง Ngrok ยังมีหลากหลายช่องสัญญาณที่มีความปลอดภัยในการรับและส่งข้อมูลจากเครื่องผู้ใช้ไปจนถึงเครื่อง Localhost (รูปภาพที่ 1 สถาปัตยกรรม Ngrok)
โดยบุคคลอื่นสามารถเข้าใช้งาน Website หรือ Application กำลังทำงานอยู่บนเครื่อง Localhost ผ่านทาง URL ของทาง Ngrok โดยที่ทาง Ngrok จะทำการสุ่มสร้าง URL ขึ้นมา และ URL ที่ได้มานั้น จะทำการเปลี่ยนไปทุกครั้งเมื่อมีการปิดหรือเปิดใช้งาน Ngrok (รูปภาพที่ 2 การเปิด-ปิดใช้งาน Ngrok)
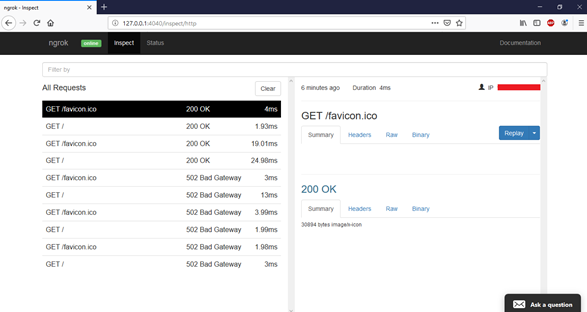
อีกทั้ง Ngrok ยังมีเว็บอินเตอร์เฟส ซึ่งสามารถใช้ตรวจสอบหรือ Monitor ผ่านทาง URL http://127.0.0.1:4040 ซึ่งสามารถใช้ตรวจสอบการรับส่งข้อมูล Http ทั้งหมด ไม่ว่าจะเป็นการรับส่งข้อมูลแบบ Get หรือแบบ Post, การขอ Request การส่ง Response, Traffic รวมถึง Webhook ที่เข้ามาใช้งานบนเครื่อง Localhost (รูปภาพที่ 3 อินเตอร์เฟส Ngrok)
OS ที่รองรับมีอะไรบ้าง
Ngrok ยังรองรับ OS ที่หลากหลายดังนี้
1. Mac OS X
2. Linux
3. Mac (32-bit)
4. Windows (32-bit)
5. Linux (ARM)
6. Linux (ARM64)
7. Linux (32-bit)
8. FreeBSD (64-Bit)
9. FreeBSD (32-bit)
ขั้นตอนการติดตั้ง Ngrok บน Linux
1. ทำการสมัครสมาชิก Ngrok ที่ https://dashboard.ngrok.com/signup (รูปภาพที่ 4 การสมัครสมาชิก Ngrok)

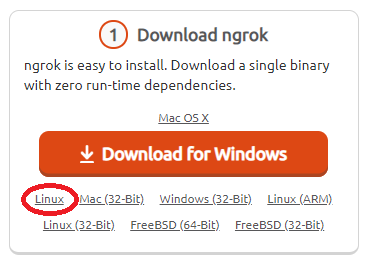
2. เมื่อสมัครสมาชิกเสร็จเรียบร้อยทำการ Login เข้ามาเพื่อดาวน์โหลด Ngrok โดยการเข้าไปที่ https://ngrok.com/download และทำการเลือก Linux (รูปภาพที่ 5.1 ดาวน์โหลดไฟล์ Ngrok บน Linux)
หรือใช้คำสั่ง (รูปภาพที่ 5.2 ดาวน์โหลดด้วยคำสั่ง Ngrok บน Linux)
wget https://bin.equinox.io/c/4VmDzA7iaHb/ngrok-stable-linux-amd64.zip

3. เมื่อทำการดาวน์โหลด Ngrok เรียบร้อยแล้วให้เข้าไปที่ Path ที่เรา Save ไฟล์ Ngork ไว้
ใช้คำสั่ง (รูปภาพที่ 6 ทำการ Unzipไฟล์ Ngrok)
unzip /path/ngrok.zip

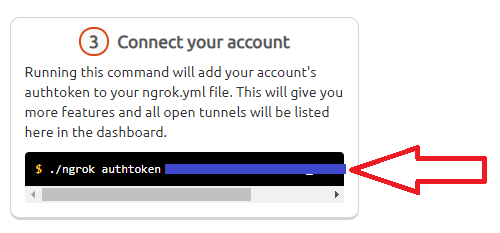
4. ทำการ Copy หรือ บันทึก Authtoken ไว้สำหรับยืนยันตัวตนโดยการเข้าไปที่ https://dashboard.ngrok.com/get-started (รูปภาพที่ 7.1 Authtoken Ngrok) จากนั้นนำ Authtoken มากรอกลง Terminal ของ Linux (รูปภาพที่ 7.2 การใช้ Authtoken Ngrok)

5. เมื่อทำการใส่ค่า Authtoken Ngrok เรียบร้อยแล้วใช้คำสั่งเพื่อทำการสั่งเริ่มต้นรันโปรแกรม โดยที่เลขที่ต่อท้ายคำสั่งคือเลขของค่า Port นั่นเอง
ใช้คำสั่ง (รูปภาพที่ 8 เริ่มต้นโปรแกรม Ngrok บน Linux)
./ngrok http 80
ใช้คำสั่ง (รูปภาพที่ 8 เริ่มต้นโปรแกรม Ngrok บน Linux)
./ngrok http 8080
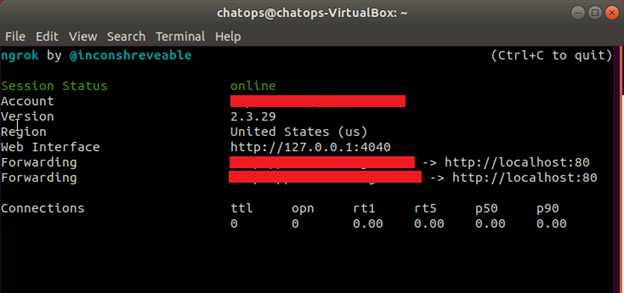
6. ทดสอบเข้าใช้งานโดยเข้าจาก URL ที่ปรากฏบน Terminal หรือเข้าดูได้จาก https://dashboard.ngrok.com/status (รูปภาพที่ 9 การเข้าใช้งาน Ngrok)

รูปภาพที่ 9 การเข้าใช้งาน Ngrok
ขั้นตอนการติดตั้ง Ngrok บน Windows
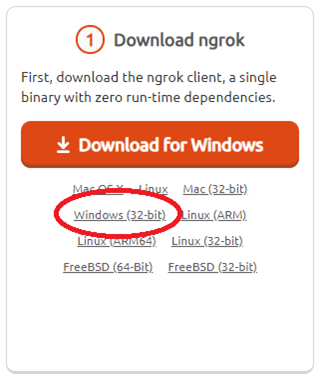
1. ทำการดาวน์โหลด Ngrok โดยการเข้าไปที่ https://ngrok.com/download และทำการเลือก Windows (รูปภาพที่ 10 ดาวน์โหลด Ngrok บน Windows)
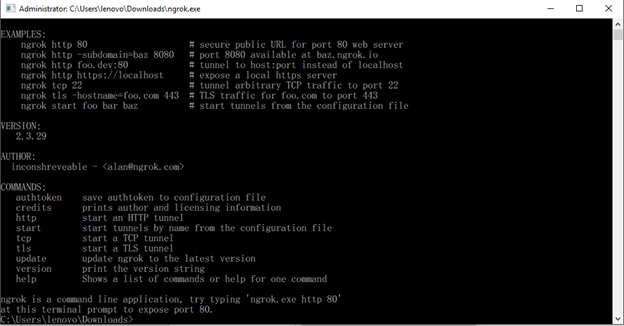
2. ทำการ Unzip ไฟล์และทำการเปิดโปรแกรมโดยการ คลิกขวา เลือก Run as administrator จะปรากฏหน้าต่าง Ngrok (รูปภาพที่ 11 การเปิดโปรแกรม Ngrok)
3. ใช้คำสั่งเพื่อทำการสั่งเริ่มต้นรันโปรแกรม โดยที่เลขที่ต่อท้ายคำสั่งคือเลขของค่า Port นั่นเอง
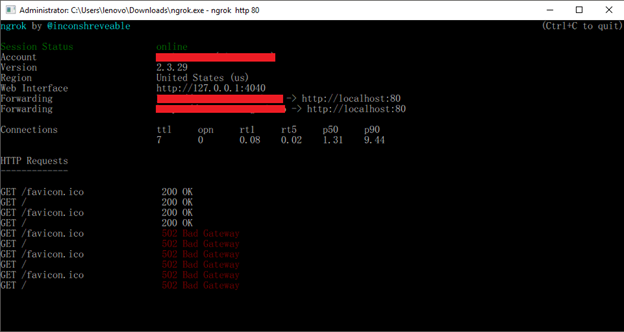
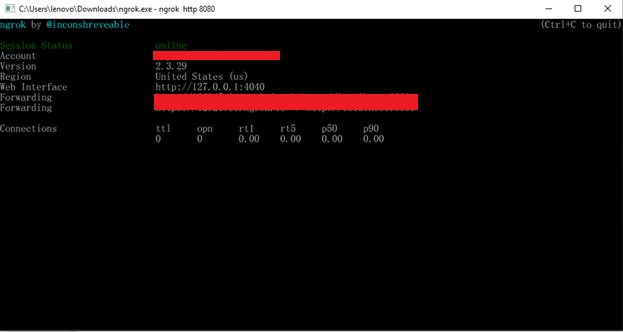
ใช้คำสั่ง (รูปภาพที่ 12 เริ่มต้นโปรแกรม Ngrok บน Windows)
ngrok http 80
ใช้คำสั่ง (รูปภาพที่ 12 เริ่มต้นโปรแกรม Ngrok บน Windows)
ngrok http 8080
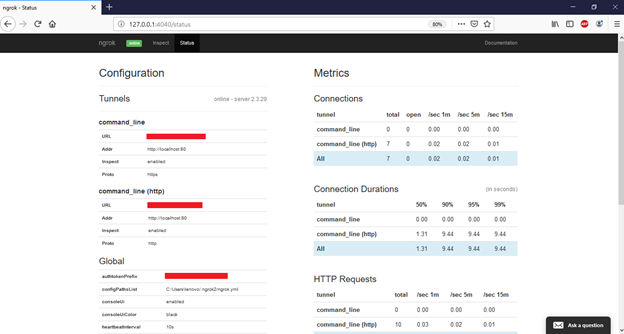
4. ทดสอบเข้าใช้งานโดยเข้าจาก URL ที่ปรากฏบน Terminal หรือเข้าดูได้จากhttps://dashboard.ngrok.com/status (รูปภาพที่ 13 การเข้าใช้งาน Ngrok)

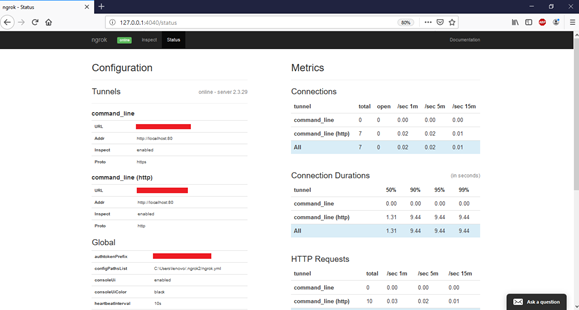
ขั้นตอนการ Monitor
1. ทำการเข้า http://127.0.0.1:4040 จะปรากฏหน้าต่างสำหรับ Monitor สามารถสตรวจสอบการเข้าใช้งานจากผู้ใช้คนอื่นๆได้ (รูปภาพที่ 14.1 All Request ของ Ngrok และรูปภาพที่ 14.2 Status ของ Ngrok)
HostPacific หวังเป็นอย่างยิ่งว่าผู้ใช้งานทุกท่านที่ได้อ่านบทความนี้ จะนำ Tool ดังกล่าวไปทดลองกับเครื่อง Locahost ของผู้ใช้เอง เพื่อใช้สำหรับพัฒนา, ทดสอบ หรือแก้ไข Website และ Application ของผู้ใช้เองก่อนนำขึ้นไปใช้จริงกับทาง Hosting อีกทั้งยังประหยัดเวลาและค่าใช้จ่ายต่างๆอีกด้วย


